Display Linux system parameters upon login
Anyone who regularly administers Linux servers will find themselves repeatedly performing the same tasks to ensure the system is running as intended. When dealing with only a few systems, this is usually done directly via SSH, as the effort of maintaining dedicated remote management tools is rarely worthwhile. So why not simply create a script that executes quick commands and filters the output to display only the essential information? This can be set up to run automatically upon every login by configuring one of the profile files or the bashrc.
On a Linux PC, you don't need to install anything that isn't already present on the server being administered. On a Windows PC, the Windows Subsystem for Linux helps; I will be using it here to generate the graphics as well. I use Ubuntu 24.04 for this—the same version running on my web servers—so I only need to make minor adjustments to the finished script after transferring it to the server. This is roughly what the result should look like:
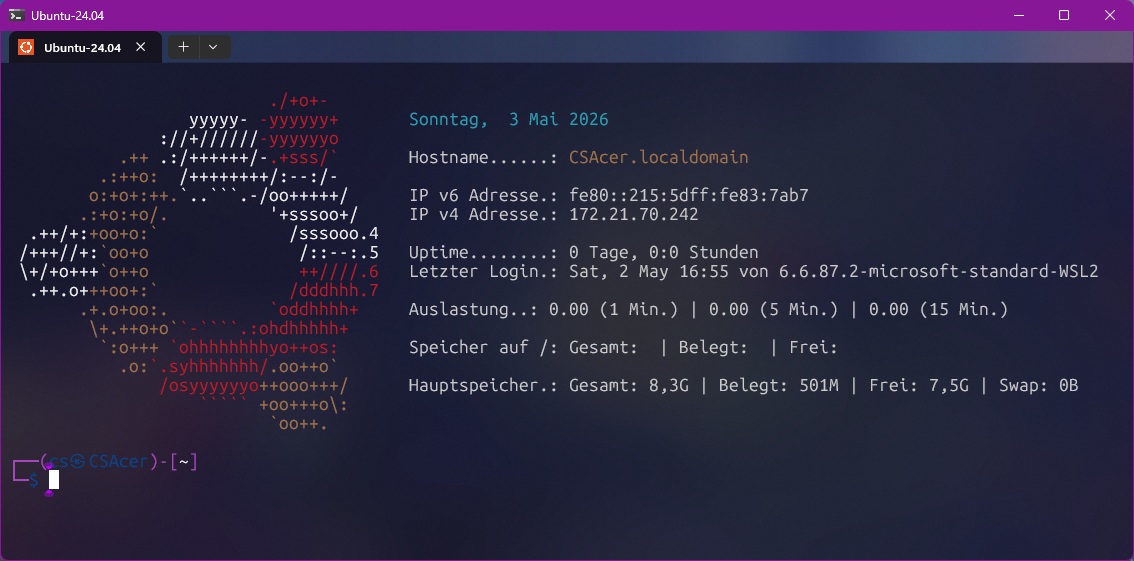
Windows Subsystem for Linux (wsl)
If you are working on a Linux machine, you can skip this section and work directly in the terminal; however, for Windows machines, I would suggest using WSL for testing, as these operations should not be performed on a production server. To launch the distribution shells, I use Windows Terminal, which can be easily installed via WinGet from a PowerShell instance running with administrative privileges:
winget install Microsoft.WindowsTerminal
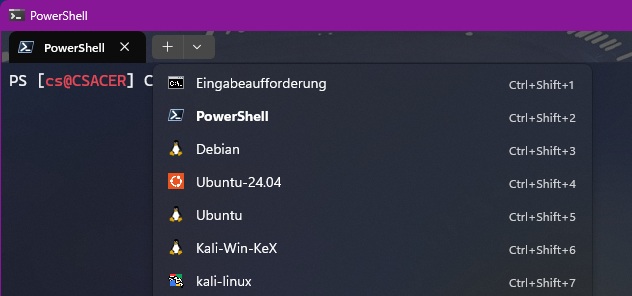
The terminal offers tabs to organize multiple shells and, in addition to calling the command prompt and PowerShell, also allows the direct starting of installed distributions.
Prerequisites for WSL
Windows 10, version 2004 and later (build 19041 and later) or Windows 11
Install WSL command
The command wsl.exe --install installs WSL with the default distribution, Ubuntu (a reboot is required). To view a list of available Linux distributions that can be downloaded from the online store, use the command wsl --list –online; these can be installed using the command wsl install [Distribution]. A complete guide is available from Microsoft.
It is important to configure the distribution to use WSL 2. The command wsl -l -v lists all installed distributions along with their current status and the WSL version being used. An asterisk indicates the default distribution.
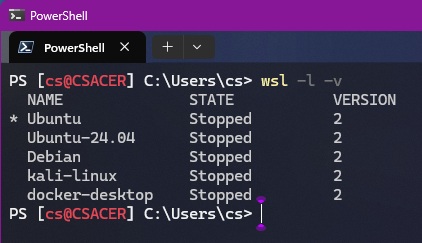
The command wsl.exe --set-version [DistroName] 2 switches a distribution to version 2, wsl.exe --set-default-version 2 sets this version as the default for all subsequently installed distributions, and wsl.exe --set-default [DistroName] makes the specified distribution the default.
The login script
Create a new file in your home directory and open it with your preferred editor. I use Visual Studio Code for this, but VIM, Nano, or MCEdit are also options.
touch ./welcome.sh
code ./welcome.sh
We begin with the shebang, which belongs on the first line of every script to ensure the use of a shell capable of handling the syntax used in our script.
#!/usr/bin/env bashNext comes a documentation header. If you want to make your script publicly available, you should also include an email address after the author's name.
# dynamische Message of the day (MOTD) für Ubuntu
# Aufruf in profile (letzte Zeile)
#
# Autor: Christian Schmidt
# Datum: 01. Mai 2026
# Lizenz: GPL-2.0
The date
The date command can be used to display the date. Results vary depending on the locale, but we can pass parameters to format the output (see man date) and store it in a variable:
# Datum und Uhrzeit
DATUM=date +"%A, %e %B %Y"
The hostname
The hostname can be displayed using the command of the same name. Using the -f parameter returns the fully qualified hostname (Fully Qualified Domain Name (FQDN)), which can also be stored directly in a variable:
# Hostname
HOSTNAME=`hostname -f`
IP addresses
Things get a bit more involved here. We need to find not only the correct fields but also the name of the interface we are interested in. First, use the ip a command to get output similar to this, showing all network interfaces:
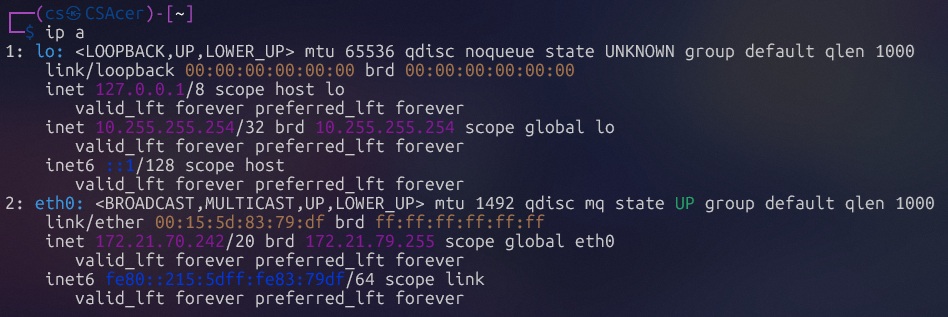
Since we are not interested in the loopback device, the name of the network interface in this example would be eth0, the IPv4 address is the next column after inet and the IPv6 address is in the next column after inet6. This means we can also write this data into a variable:
# IP Adressen
IPV4=`ip addr show eth0 | grep -vw "inet6" | grep "global" | grep -w "inet" | cut -d/ -f1 | awk '{ print $2 }'`
IPV6=`ip addr show eth0 | grep -vw "inet" | grep "link" | grep -w "inet6" | cut -d/ -f1 | awk '{ print $2 }'`
Let's take it step by step! Commands can be chained together using the pipe symbol | . This passes the command to the left of the pipe symbol—or rather, its output—to the command on the right. Let's put this together for the IPv4 address:
ip addr show eth0outputs only theeth0interface from the previous example.grep -vw "inet6"searches the output forinet6(using the-wparameter) but outputs everything except that (using the-vparameter).grep "global"searches the result forglobaland outputs the line where it is found.cut -d/ -f1cuts the string at the delimiter/(-d/), extracts the first field (-f1; note that counting starts at 0), and outputs the result.awk '{ print $2 }'then returns the second field (here, counting starts at 1) as the final result. You should now be able to figure out the command chain for the IPv6 address yourself. As previously recommended for the date command, look up the individual commands in the manual (man (command)).
Uptime (since reboot)
In Linux, everything is a file, so a great deal of relevant information can be read from the virtual process filesystem located under /proc. This includes the system uptime from /proc/uptime. The time in seconds since the system last started is found in the first field, which we can use to calculate the required values:
# Uptime
UP0=`cut -d. -f1 /proc/uptime`
UP1=$(($UP0/86400))        # Tage
UP2=$(($UP0/3600%24))      # Stunden
UP3=$(($UP0/60%60))        # Minuten
UP4=$(($UP0%60))           # Sekunden
Last login
Each login is recorded in binary format in /var/log/wtmp (except in Debian 13 Trixie)—along with additional information—and the last command can provide access to this data.

# letzter Login
LAST1=`last -2 -a | awk 'NR==2{print $4}'`    # Wochentag
LAST2=`last -2 -a | awk 'NR==2{print $6}'`    # Tag
LAST3=`last -2 -a | awk 'NR==2{print $5}'`    # Monat
LAST4=`last -2 -a | awk 'NR==2{print $7}'`    # Uhrzeit
LAST5=`last -2 -a | awk 'NR==2{print $11}'`   # Remote-Computer
Using awk, we select a specific field (print $(field number starting at 1)) from the second line (NR=2) of the last command's output—limited to two entries (-2)—and store it in a variable. The -a parameter instructs last to place the remote host information in the final column; on a system accessed via SSH, this corresponds to the IP address of the user logging in.
System load
We retrieve the current system load (load average) from the virtual process filesystem again—this time from /proc/loadavg. Strictly speaking, the file should be read into a variable just once, and that variable should be used for subsequent operations.
# Durchschnittliche Auslasung
LOAD1=`cat /proc/loadavg | awk '{print $1}'`    # Letzte Minute
LOAD2=`cat /proc/loadavg | awk '{print $2}'`    # Letzte 5 Minuten
LOAD3=`cat /proc/loadavg | awk '{print $3}'`    # Letzte 15 Minuten
Disk storage
First, identify the line corresponding to the root directory (/) in the output of the df -h command and note the device name (/dev/xxx). Examples include sda or sdb for spinning drives, nvme0n for PCIe drives, and sometimes vda for virtual cloud servers. If multiple drives are present, you may also need to include the trailing number.
# Speicherbelegung
DISK1=`df -h | grep 'dev/sd' | awk '{print $2}'`    # Gesamtspeicher
DISK2=`df -h | grep 'dev/sd' | awk '{print $3}'`    # Belegt
DISK3=`df -h | grep 'dev/sd' | awk '{print $4}'`    # Frei
I have intentionally shortened the device name here, as WSL tends to increment the name between calls—meaning a drive initially recognized as /dev/sdd might suddenly become /dev/sde. However, since WSL typically has only one virtual drive mounted, no surprises are to be expected in this regard.
Main memory
First, we need to check the output of the free command to see how RAM and swap space are labeled so that we can search for them. It should now be clear how the command chain is constructed.
# Arbeitsspeicher
RAM1=`free --mega -h | grep 'Speicher' | awk '{print $2}'`    # Total
RAM2=`free --mega -h | grep 'Speicher' | awk '{print $3}'`    # Used
RAM3=`free --mega -h | grep 'Speicher' | awk '{print $4}'`    # Free
RAM4=`free --mega -h | grep 'Auslager' | awk '{print $3}'`    # Swap used
Output of the collected data
Essentially, all that remains is to output the data collected in the variables.
# Ausgabe des Logos und der erfassten Werte
echo „ $DATUM
 Hostname......: $HOSTNAME
 IP v6 Adresse.: $IPV6
 IP v4 Adresse.: $IPV4
 Uptime........: $UP1 Tage, $UP2:$UP3 Stunden
 Letzter Login.: $LAST1, $LAST2 $LAST3 $LAST4 von $LAST5
 Auslastung..: $LOAD1 (1 Min.) | $LOAD2 (5 Min.) | $LOAD3 (15 Min.)
 Speicher auf /: Gesamt: $DISK1 | Belegt: $DISK2 | Frei: $DISK3
 Hauptspeicher.: Gesamt: $RAM1 | Belegt: $RAM2 | Frei: $RAM3 | Swap: $RAM4“
The actual echo command spans multiple lines, encompassing everything between the quotation marks. This allows for the use of linefeed characters without relying on special characters or escape sequences that might compromise readability.
You can test this by first making the script executable and then running it:
chmod +x ./welcome.sh
./welcome.sh
Integration as a logon script
There are several options. Depending on whether it should be set up for all or just certain users, it must be in the profile file as the last entry below /etc or within the home directory of each user who is to receive it. It is important to ensure that the file is hidden in the home directory, i.e. begins with a dot, but not in the configuration directory /etc.
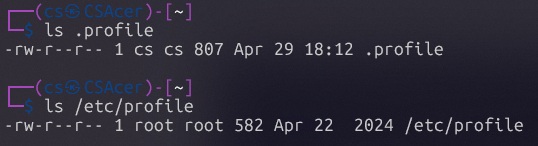
If only one user is to receive this script, it can remain in the home directory; otherwise, I would copy it to a generally accessible directory and transfer ownership to root.
cp ./welcome.sh /var/local/welcome.sh
chown root:root /var/local/welcome.sh
Then simply log out and back in, or launch a new instance of bash.
Escape sequences
If that looks too boring for your taste, you can add some color. As shown in the first image of this post, I’ve not only colored the date and hostname but also incorporated the Ubuntu logo. This is particularly helpful when managing multiple virtual machines running different distributions. Simply search online for "ASCII art" plus your distribution's name, or download an image of the desired logo and feed it into a conversion service. There are several such services available, some of which even provide the necessary color escape sequences. I’ll demonstrate how this works using the date and hostname; the rest is up to you. You can find a fairly comprehensive list of escape sequences—including a color chart—courtesy of ConnerWill on GitHub Gists.
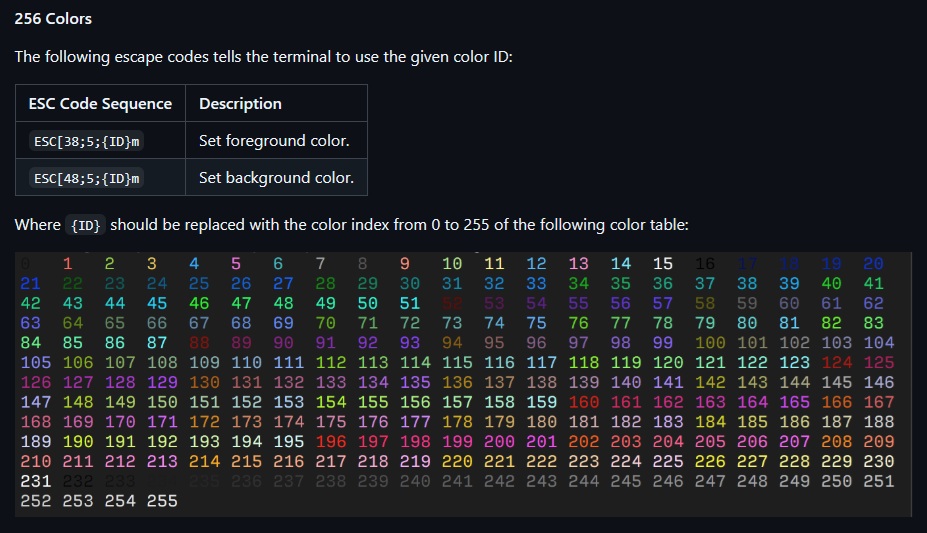
But back to the script. First, the echo command must be told that we would like to use ANSI escape sequences and that it should process them accordingly. To do this, change the first line of the command as follows:
echo -e „ $DATUMI use the octal notation \033 to start a sequence. Combining this with ID=38 (the color I chose for the date) and ID=136 (for the hostname) results in the sequence \033[38;5;38m before the date and \033[38;5;136m before the hostname, along with \033[0m after each colored text segment to reset the formatting. So, modify the first two lines of the echo command as follows:
echo -e „ \033[38;5;38m$DATUM\033[0m
Hostname......: \033[38;5;136m$HOSTNAME\033[0m
No, escape sequences don't exactly make things easier to read, but just wait until you try adding the distribution's logo in color. Have fun experimenting!
Additional task
The Gist linked above also lists the escape sequences required to move the cursor. This allows the script to separate the text output of variables from the distribution logo. The logo is displayed in one command and the variables in a second, with the cursor needing to be repositioned for each output.
Update May 8, 2026, 11:30 a.m.
I have posted the complete script for Debian for download.
curl https://www.jcs-net.de/downloads/welcome.sh
Feel free to talk shop or leave a comment on the Fediverse.