Reusing Old Hardware
Who doesn’t have a piece of hardware or two at home that hasn’t received updates in years but continues to do its job quietly in the background?! Aside from devices that appear in the news because they’ve been misused in bot armies, their usefulness is also hampered by the advancing technology they’re supposed to support. I’d like to share one such example today: A Western Digital MyBook Live NAS, which received its last firmware update in 2015, has been serving as a backup destination for my current NAS for years.
Until now, it had simply been integrated as CIFS/SMB storage, but it stopped working months ago. It wasn’t that the device itself had a (new) problem, but the workarounds needed to access the NAS’s antiquated SMB 1 protocol were ultimately removed from the current NAS’s operating system, so it simply could no longer access the MyBook Live.
Hardware
In the spec sheets, the apm82181 (PowerPC architecture) GHz processor still sounds pretty decent. The device has a Gigabit Ethernet port and, in my case, a 3 TB hard drive (the device was also available back then with 1 and 2 TB drives). But these specs only looked good on paper. With its 256 MB of RAM and a single-core processor running at just around 800 MHz, the MyBook Live achieved no more than 20 MB/s write speed and 40 MB/s read speed even at the time of its release. The hard drive wasn’t the limiting factor even back then.
Firmware
However, the age of the latest available firmware isn’t the MyBook Live’s only problem. Conceived as a jack-of-all-trades, it comes with a Twonky media server, and its Debian internals render the web interface using PHP. It also requires certain file system permissions that correspond to the partitioning—which was already a nuisance in the past. So, for a device that’s now used solely as a block device, it runs quite a few unused services, all of which are taxing the underpowered CPU and consuming memory.
Possible Solutions
It makes perfect sense to search online for DIY enthusiasts or their tutorials using the device’s name, but in most cases, you’ll end up with setups that also use Debian. However, the PowerPC architecture was already discontinued in 2020, and I didn’t find it very appealing to install an image that was only 5 years newer, which would likely be even bulkier than the manufacturer’s.
The Solution
Sometimes it’s wise to stray from the beaten path and consider approaches that might seem nonsensical at first. Which class of devices is similarly limited yet is often literally overwhelmed with features? Routers—and OpenWRT supports a huge variety of platforms and processors!
The starting point is the OpenWRT Firmware Selector:
The page opens with a search box that should already have the latest release selected on the right (in the example, 25.12.5). Enter the name of your device (bit by bit) into the search field—the search starts immediately—so feel free to type slowly. If your device isn’t in the list, that doesn’t mean it isn’t supported; it just means that no one has worked on your specific device yet. You can then search, for example, by your device’s processor or its group (in my example, apm821xx). Once you’ve made a suitable selection, the page will switch to the build screen:
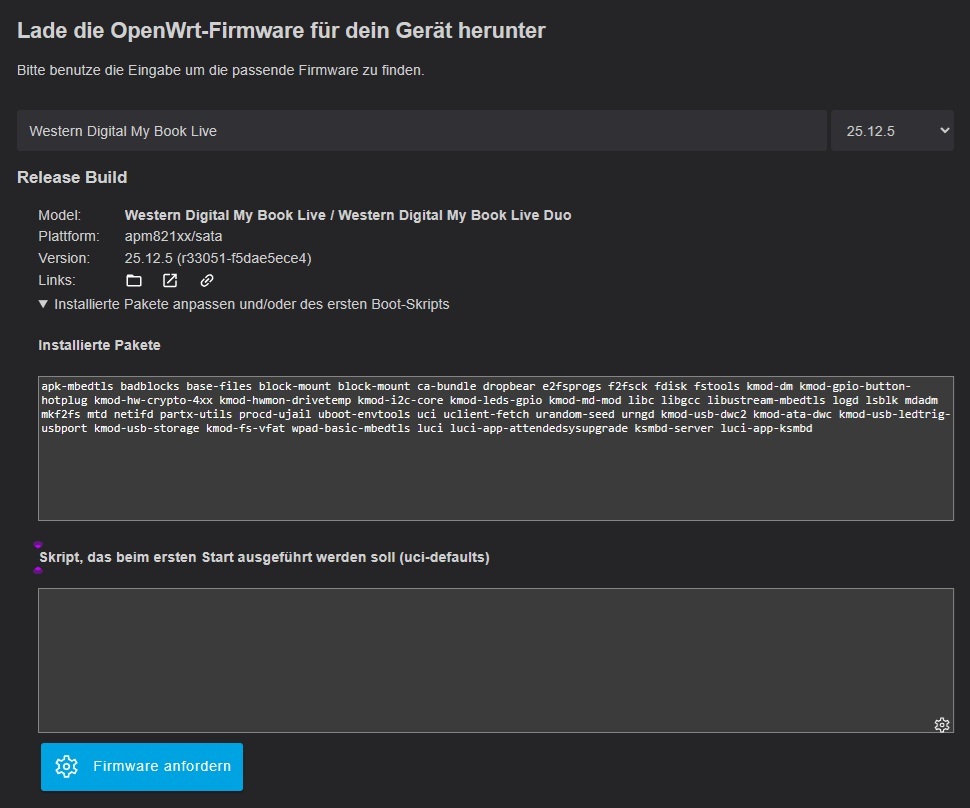
If you click the Customize Installed Packages... line, you’ll also see a list of the packages already selected. I added ksmbd-server luci-app-ksmbd here to get the CIFS/SMB support I need without having to install the full-featured Samba server. If in doubt, it’s better to leave something out than to overload the image. The system uses a small 100 MB system partition! If everything looks good, click Request Firmware. The firmware is compiled immediately and made available on the server as an image—this may take a few minutes, but a progress bar will show your progress.
Once the image is ready, you can download it further down the page. You’ll need the Faktory image; note that SquashFS creates a read-only image on your device, which allows for a reset, while EXT4 creates an open partition that you can install directly into (via SSH). I’ve selected ext4 here to have as much freedom as possible on my first attempt, and I don’t expect to mess anything up that would require a reset.
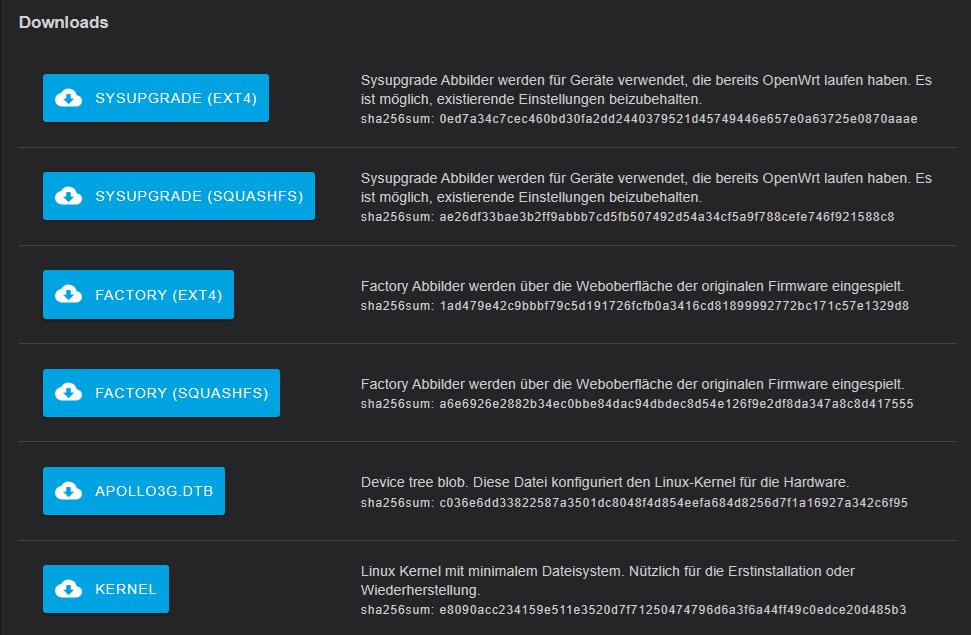
If you want to update your firmware later, simply follow the same steps again and use the OpenWRT web interface on your device to flash the resulting image.
Installation
Unlike with a router, which often requires rather unconventional steps to replace its manufacturer’s firmware with OpenWRT, with the NAS I can simply copy the image to the hard drive. The WD MyBook Live enclosure is merely snapped into place, but the four small plastic tabs can break off very easily. The computer—a tiny circuit board—is screwed to the bottom of the hard drive with four screws and can be carefully slid out of the SATA connector after loosening the screws. Two steel plates are screwed to the sides of the drive with another four screws; once these are removed, the drive’s metal casing can also be taken off. The now-bare HDD (WDC WD30EZRS-11J99B1) can be connected to a PC using a SATA/USB adapter or a SATA dock and flashed with the previously downloaded image.
Since the OpenWRT image comes compressed as a gz file, it must first be decompressed. To do this, I used 7-Zip and transferred it to Windows using [Win32DiskImager](https://www.heise.de/download/product/win32-disk-imager -92033) on Windows. If you’re doing this on Windows, you may need to ignore or cancel any pop-up messages about uninitialized or unformatted drives. On Linux, dd does the job. Once the MyBook Live is reassembled, you can reconnect it to the Ethernet and power supply to boot up the new system for the first time. OpenWRT will obtain an IP address via DHCP and should be accessible on the network under the hostname openwrt. If this doesn’t work right away, check your router to see which IP address it was assigned so you can connect to it in your browser (http://IP-oder-Hostname). Log in using root without a password and decline the subsequent prompt for online updates. Now go to System -> Administration to set a password, and then establish an SSH connection in a shell (I use PowerShell)—you can also use the IP address instead of the hostname there:
ssh root@openwrtFirst, let's have the package manager update the repository, install gdisk, and take a look at the partitioning:
apk update
apk add gdisk
fdisk -l /dev/sda
Two partitions should be displayed:
Disk /dev/sda: 2.73 TiB, 3000592982016 bytes, 5860533168 sectors
Disk model: WDC WD30EZRS-11J
Units: sectors of 1 * 512 = 512 bytes
Sector size (logical/physical): 512 bytes / 4096 bytes
I/O size (minimum/optimal): 4096 bytes / 4096 bytes
Disklabel type: dos
Disk identifier: 0x5452574f
Device     Boot Start    End Sectors  Size Id Type
/dev/sda1  *     8192  24575   16384    8M 83 Linux
/dev/sda2       32768 245759  212992  104M 83 Linux
The “Disklabel type: dos” here tells us that the disk is still configured as an MBR device, which can only address up to 2 TB—which is a problem with a 3 TB HDD. However, we must assume that the WD firmware had previously accessed the disk using the GPT scheme in order to utilize the entire disk, and since our image copy operation only wrote the two partitions at the beginning, a corrupted GPT section still exists at the end of the disk. So we should be careful not to let it become active again!
gdisk /dev/sda
p
GPT fdisk (gdisk) version 1.0.10
Caution: invalid main GPT header, but valid backup; regenerating main header
from backup!
Warning: Invalid CRC on main header data; loaded backup partition table.
Warning! Main and backup partition tables differ! Use the 'c' and 'e' options
on the recovery & transformation menu to examine the two tables.
Warning! Main partition table CRC mismatch! Loaded backup partition table
instead of main partition table!
Warning! One or more CRCs dont match. You should repair the disk!
Main header: ERROR
Backup header: OK
Main partition table: ERROR
Backup partition table: OK
Partition table scan:
MBR: MBR only
BSD: not present
APM: not present
GPT: damaged
Found valid MBR and corrupt GPT. Which do you want to use? (Using the
GPT MAY permit recovery of GPT data.)
1 - MBR
2 - GPT
3 - Create blank GPT 1This loads the MBR partition table, and we take another look at the current status:
pDisk /dev/sda: 5860533168 sectors, 2.7 TiB
Model: WDC WD30EZRS-11J
Sector size (logical/physical): 512/4096 bytes
Disk identifier (GUID): 4607FCC8-20BD-40D5-A569-B81EA9A7B7DA
Partition table holds up to 128 entries
Main partition table begins at sector 2 and ends at sector 33
First usable sector is 34, last usable sector is 5860533134
Partitions will be aligned on 2048-sector boundaries
Total free space is 5860303725 sectors (2.7 TiB)
Number Start (sector) End (sector) Size Code Name
1 8192 24575 8.0 MiB 8300 Linux filesystem
2 32768 245759 104.0 MiB 8300 Linux filesystemNow we create the third partition for our data:
nConfirm each of the four subsequent prompts by pressing Enter ↵ (accepting the defaults). Finally, view the result again with p and write it to the disk with w:
p [...]
Number Start (sector) End (sector) Size Code Name
1 8192 24575 8.0 MiB 8300 Linux filesystem
2 32768 245759 104.0 MiB 8300 Linux filesystem
3 245760 5860532223 2.7 TiB 8300 Linux filesystem wgdisk will ask you for explicit confirmation once more:
Do you want to proceed? (Y/N): y
OK; writing new GUID partition table (GPT) to /dev/sda.
Warning: The kernel is still using the old partition table.
The new table will be used at the next reboot or after you
run partprobe(8) or kpartx(8)
The operation has completed successfully.
And since our attention is being drawn to it so directly, let's go ahead and restart the NAS.
rebootCreating the third partition switched the disk back to GPT, and you just tested whether the MyBook Live still boots with this configuration. Let's take a look at that right away—so log in via SSH again (ssh root@openwrt):
fdisk -l /dev/sdaDisk /dev/sda: 2.73 TiB, 3000592982016 bytes, 5860533168 sectors
Disk model: WDC WD30EZRS-11J
Units: sectors of 1 * 512 = 512 bytes
Sector size (logical/physical): 512 bytes / 4096 bytes
I/O size (minimum/optimal): 4096 bytes / 4096 bytes
Disklabel type: gpt
Disk identifier: 4607FCC8-20BD-40D5-A569-B81EA9A7B7DA
Device Start End Sectors Size Type
/dev/sda1 8192 24575 16384 8M Linux filesystem
/dev/sda2 32768 245759 212992 104M Linux filesystem
/dev/sda3 245760 5860532223 5860286464 2.7T Linux filesystemNow we format partition 3 as ext4:
mkfs.ext4 -L backup -m 0 /dev/sda3A permanent mount point that survives a reboot is also needed:
mkdir -p /mnt/backup
uci add fstab mount
uci set fstab.@mount[-1].device='/dev/sda3'
uci set fstab.@mount[-1].target='/mnt/backup'
uci set fstab.@mount[-1].fstype='ext4'
uci set fstab.@mount[-1].enabled='1'
uci commit fstab
block mount
And a user with whom we can access it (password freely selectable, enter directly):
which useradd || apk add shadow-useradd
useradd backup
passwd backup
The SMB user we use for external access. You will be asked for a password again; to avoid confusion later, I chose the same password as before—though you don't have to do that.
ksmbd.adduser -a backupNow, grant the user permission for the partition:
chown backup:backup /mnt/backupZuletzt noch eine Freigabe in der Weboberfläche (http://openwrt) einrichten unter Services → Network Shares:
- Name: backup
- Path: /mnt/backup
- Guest ok: nein
- Read only: nein
- Users / Allowed users: backup
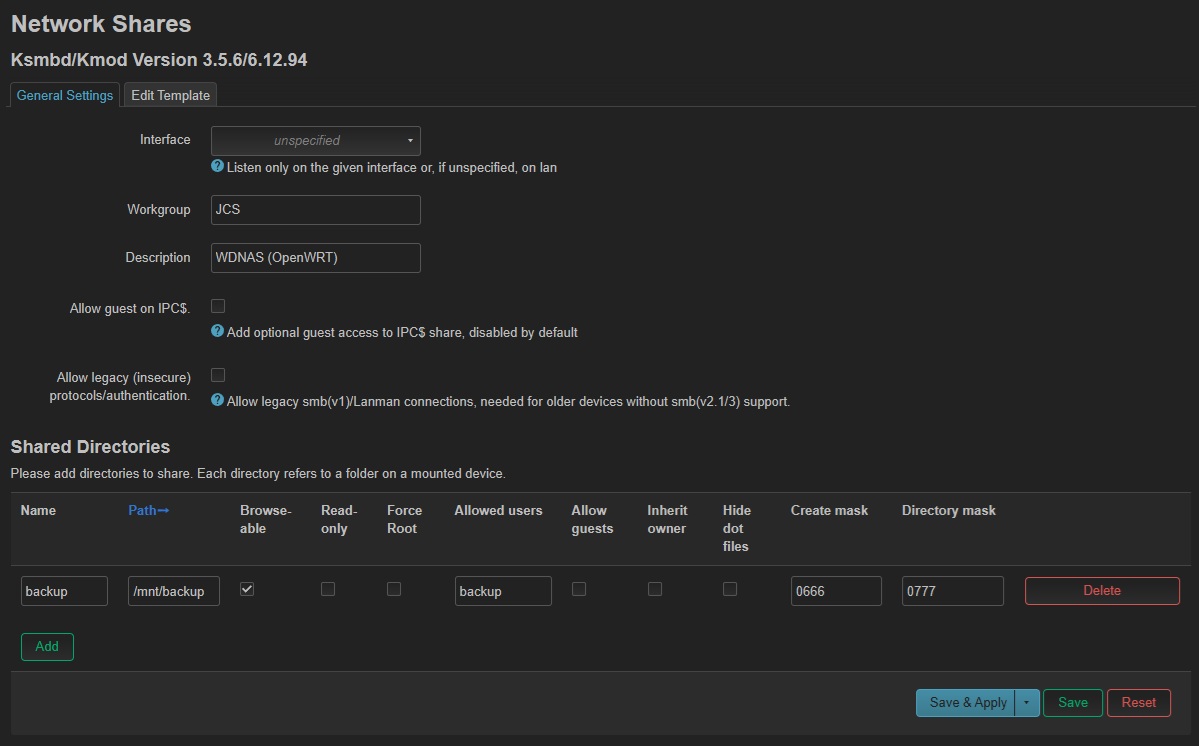
The share can already be accessed from Windows, macOS, and Linux, but that wasn't the goal—the old NAS is far too slow for that. I want to back up data to it from my Synology NAS; Synology’s Hyper Backup solution is somewhat picky about its destinations, and I’m not keen on introducing SMB overhead into the backup process. rsync is the best choice here, so I need to configure the MyBook Live to support it via the SSH shell:
apk add rsyncdcat > /etc/rsyncd.conf << 'EOF'
pid file = /var/run/rsyncd.pid
log file = /var/log/rsyncd.log
use chroot = no
read only = no
max connections = 4
timeout = 300
[backup]
path = /mnt/backup
comment = Hyper Backup Ziel
read only = no
list = yes
uid = backup
gid = backup
auth users = backup
secrets file = /etc/rsyncd.secrets
EOFecho 'backup:DEIN-PASSWORT-HIER' > /etc/rsyncd.secrets
chmod 600 /etc/rsyncd.secretsThen activate and start the service:
/etc/init.d/rsyncd enable
/etc/init.d/rsyncd start
The child needs a name
Okay, this isn't strictly necessary, but I didn't find OpenWRT particularly self-explanatory as a hostname for a NAS, so I went ahead and changed that too:
uci set system.@system[0].hostname='WDNAS'
uci commit system
/etc/init.d/system reload
Conclusion
If you run a device like this on a LAN without transport encryption, you can expect write speeds of 10–15 MB/s and read speeds of up to 40 MB/s. Enabling transport encryption can cut these speeds in half again, as the processor simply lacks the necessary overhead. It is better to encrypt the backup on the client side before transmission if security is a priority. However, since regular, scheduled server-to-server backups usually take place at night, the specific read/write speeds are not particularly critical. That said, this approach allowed me to breathe new life into a very old system that still serves a genuine purpose; after all, only the initial run requires transferring the entire dataset. Backing up the small daily changes afterwards is quite fast, despite the low data rate.
You can share questions and suggestions with me on the Fediverse.