Customize Grav
For me, it started with minor formatting tweaks—little things that bothered me, like how something looked or how much space it took up or wasted—and I soon came across an empty custom.css file in the Grav Quark theme that was intended for such customizations. Don’t do that—plugins and themes aren’t updated during so-called “updates”; they’re deleted and the new version is installed. Your changes will then be gone!
There are several ways to avoid this in Grav. You’ve probably seen a note in an installation guide suggesting that you copy the configuration file to a directory under user/config/ and then modify only that copy. That’s one way to do it. But what about when you want to make more significant customizations? Want to modify a Twig template or even add your own, completely new templates? That might sound complicated at first, but just keep reading and form your own opinion at the end of this post.
Creating a Child Theme
Don’t worry—you don’t have to develop a standalone theme. You’ve already chosen a theme, and you should continue using it. You can create a child theme in just a few simple steps. You just need to follow a few rules so that Grav recognizes it as a standalone theme and you can activate it later. I’ll use the Quark 2 theme as an example, since I use it myself and can thus ensure that I’m accurately reflecting Grav’s rules.
Initialization
Your theme needs a name—you’re free to choose any name, but I’d recommend including the parent theme’s name so you can identify it later. If you’re using the Admin2 plugin, you can simply select your theme under “Themes” and note down the slug from its overview page. Without the Admin2 plugin, you’ll need to navigate to the directory under user/themes/ to the directory of the theme you’re using (in my example, that would be user/themes/quark2/) and retrieve the slug from the blueprints.yaml file there (which is also quark2 in the example). I decided to compose the new name using a part of the hostname (important for multisite setups), the parent theme, and the suffix “child”: jcs-quark2-child
The hyphens are only for readability, but they also help in the file system. So use them to create a new directory under user/themes/:
cd user/themes
mkdir jcs-quark2-child
In the new directory, copy three files from the theme you're already using; two of them have the theme's slug in their names, and they must have the same slug in your new child theme as well:
cp user/themes/quark2/blueprints.yaml user/themes/jcs-quark2-child/blueprints.yaml
cp user/themes/quark2/quark2.yaml user/themes/jcs-quark2-child/jcs-quark2-child.yaml
cp user/themes/quark2/quark2.php user/themes/jcs-quark2-child/jcs-quark2-child.php
# wenn du es später schick im Admin2 Plugin angezeigt bekommen möchtest, auch noch die Images
cp user/themes/quark2/screenshotjpg user/themes/jcs-quark2-child/screenshotjpg
cp user/themes/quark2/thumbnail.jpg user/themes/jcs-quark2-child/thumbnail.jpg
So far, you've created a clone of the existing theme, which you now need to define as a standalone child theme. To do this, first edit the user/themes/jcs-quark2-child/jcs-quark2-child.yaml file. You can choose any name you like; you'll later find your theme under “Themes” in the Admin2 plugin. The slug must match the directory name. Add the parent theme (in this case, quark2) to the dependencies section using its slug, in addition to any existing dependencies. Leave everything below form: unchanged.
name: JCS Quark 2 Child
slug: jcs-quark2-child
type: theme
version: 1.0.0
description: Custom Child Theme Based on Quark 2
icon: meteor
author:
  name: Christian Schmidt
  email: dont@mail.me
  url: https://www.jcs-net.de
homepage: https://www.jcs-net.de
keywords: theme, quark2, child
bugs: https://www.jcs-net.de
license: MIT
dependencies:
  - { name: grav, version: '>=1.7.0' }
  - quark2
compatibility:
  grav: ['1.7', '1.8', '2.0']
Next, edit your actual theme class (here, user/themes/jcs-quark2-child/jcs-quark2-child.php). In the first few lines, you’ll find the class definition: class Quark2 extends Theme, where class Quark2 defines the name of your parent theme (Quark2)—this is case-sensitive, so be sure to write it down! After that, delete the entire contents of the file and replace them with the definition of your own theme class.
namespace Grav\Theme;

use RocketTheme\Toolbox\Event\Event;

class JcsQuark2Child extends Quark2
{
    public static function getSubscribedEvents()
    {
        return array_merge(
            Quark2::getSubscribedEvents(),
            [
                'onTwigSiteVariables' => ['onTwigSiteVariables', 0],
            ]
        );
    }

    public function onTwigSiteVariables()
    {
        $this->grav['assets']->addCss('theme://css/custom.css');
    }
}
All you need to change here is the class definition class JcsQuark2Child extends Quark2 and Quark2::getSubscribedEvents(). JcsQuark2Child is the name of your theme class: just take the directory name, capitalize the first letter of each word, and remove the hyphens. extends Quark2 is what makes it work: Quark2 is the name you noted down in the previous step, and this specifies that your theme should inherit all properties and methods from the parent theme Quark2, while getSubscribedEvents() ensures that your theme is also notified of events by Grav—we’re simply hooking into the same method within the Quark2 theme.
Last but not least, configure the settings for your theme in user/themes/jcs-quark2-child/jcs-quark2-child.yaml. First, set enabled: false—your website already has an active theme! You can customize the other values to your liking. Now all that’s left is to bring everything together. Insert the following lines above the aforementioned enabled: false:
streams:
  schemes:
    theme:
      type: ReadOnlyStream
      prefixes:
        '':
          - 'user://themes/jcs-quark2-child'
          - 'user://themes/quark2'

# Default values inherited from quark2.yaml (are
# NOT automatically inherited from the parent theme.
# Can be further customized via the admin panel (Blueprint form fields at the top).
enabled: false
After that, clear all caches once—either through the Admin2 interface or from the shell:
bin/grav clearcacheActivation
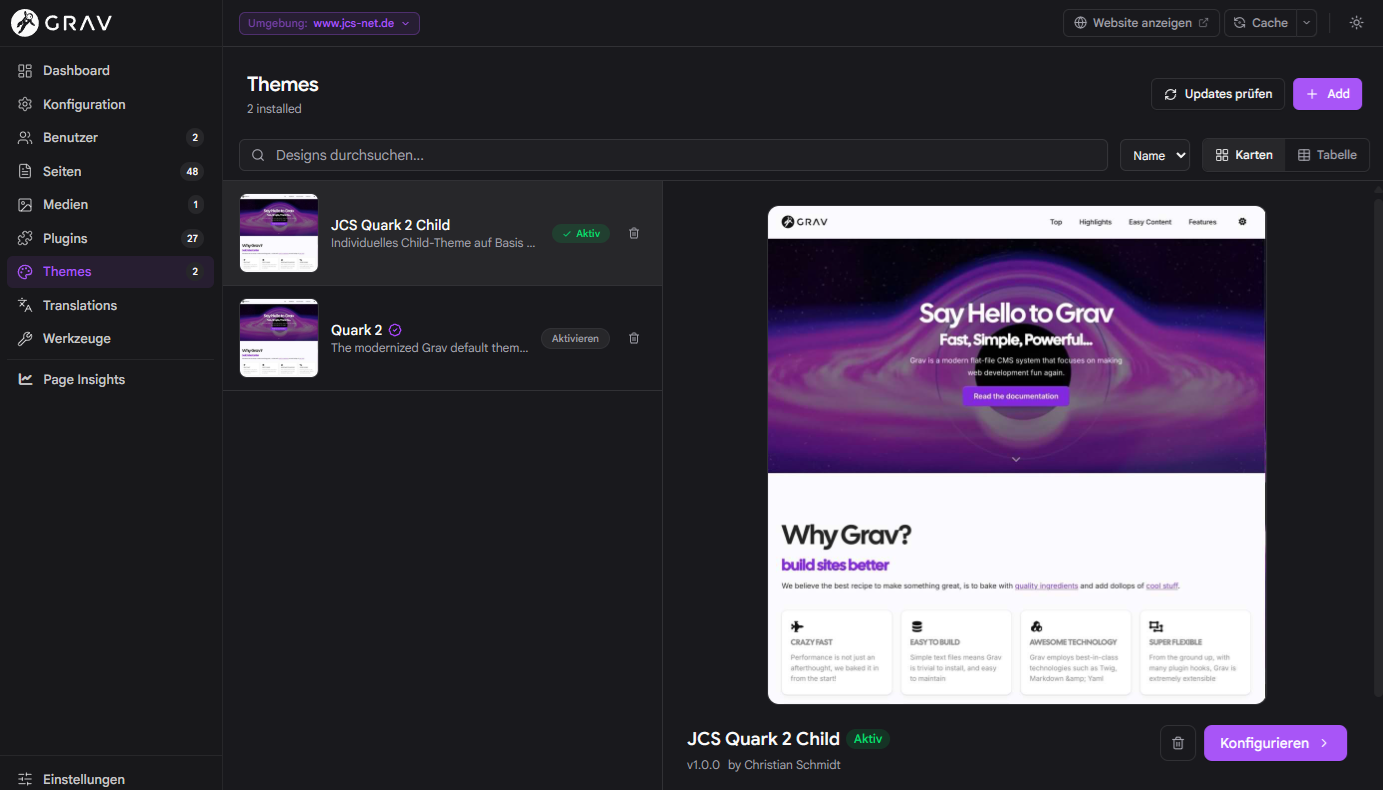
If you’ve made it this far through the guide without any typos, your new child theme should now appear in the Admin2 interface, and you can activate it from the overview of all installed themes. Your previously active theme will be automatically deactivated, but nothing will visibly change on your website since your child theme inherits from it. At this point, you’ve earned a break.
Using the Child Theme for Customizations
So far, we’ve simply laid the groundwork for our own customizations, but why go to all this trouble? Well, before creating the child theme, the problem was that customizations wouldn’t survive an update to the modified component. Now, the parent theme can be updated without any worries. The child theme inherits the changes resulting from the update and only overrides what you’ve customized in the child theme—or adds properties. Let’s start with CSS properties as an example.
A Custom Style
At the beginning of this post, I already mentioned custom.css. We can now use one safely. Create a directory named css/ in your theme and a file named custom.css inside it. Since Quark2 already includes this file, your custom.css will override it and be automatically included.
mkdir user/themes/jcs-quark2-child/css
touch user/themes/jcs-quark2-child/css/custom.css
Let me use my first change to the Quark2 theme as an example: When switching from Quark to Quark2, I noticed that Quark2 adds a sort of “kicker” before many headings, and I wanted to get rid of it. Although I only found these kickers in H2 headings, I figured I should protect myself right away against future issues of this kind (comment on every change in enough detail so that you can still figure out later why you made it):
/* Quark2 zeichnet standardmäßig einen kurzen "Kicker"-Strich vor h2 (und
   ggf. weiteren Ebenen) via ::before. */
h1::before,
h2::before,
h3::before,
h4::before,
h5::before,
h6::before {
  display: none !important;
}
Functional Changes
In principle, you can copy any file from the parent theme into yours, customize it there, and create entirely new templates of your own. However, the child theme becomes particularly powerful thanks to Grav’s shared directory structure. Not only themes but also plugins share this structure, so you can, for example, override templates from both the parent theme and installed plugins in the templates/ directory. Let me use another example I’ve set up myself: the Archives plugin creates a linked list in the sidebar showing the months (month/year) in which blog posts were published; clicking on a month brings up a list of those posts for viewing. This is a pretty handy feature, but it’s very wasteful with available space and therefore only displays a limited number of months—a setting you can configure via the admin panel. Although the plugin includes a template that lists only the years, that wasn’t enough for me. How about creating a tree structure where the nodes represent the years and the leaves represent the months?
The plugin’s template is located in user/plugins/archives/templates/partials/archives.html.twig and must be included in the child theme to override it:
mkdir user/themes/jcs-quark2-child/templates
mkdir user/themes/jcs-quark2-child/templates/partials
touch user/themes/jcs-quark2-child/templates/partials/archives.html.twig
Then this template is brought to life:
{#
  Override the “templates/partials/archives.html.twig” file in the “grav-plugin-archives” plugin.

  Grav evaluates Twig templates in the active theme before
  falling back on the templates provided by the plugin. Therefore, simply placing this file under the same relative path
  in the child theme is sufficient to replace the plugin’s flat list with a
  “Year > Month” tree structure without modifying the plugin itself:

    user/themes/jcs-quark2-child/templates/partials/archives.html.twig

  Structure:
    - Top level = one expandable and collapsible <details> per year (native HTML expansion function,
      no JS required, keyboard-accessible).
    - The most recent year (the first one encountered) is initially expanded; all others
      are initially collapsed. This requires “plugins.archives.order.dir: desc” (the
      plugin’s default setting), so that the most recent year is rendered as the first group.
    - Months are nested under their respective years in <li>, while retaining the original plugin
      classes (archives / archive_date / label), so that the built-in archives.css
      continues to style them—only the new year-level wrapper requires a little
      additional CSS.
    - Month names pass through the |td filter (Translate Date plugin, ICU pattern)
      instead of the raw |date filter, consistent with how the rest of the
      website localizes dates (blog list, individual posts). |td follows the
      current language setting in Grav, so German month names should automatically be displayed on /de and
      English month names on /en.
#}

{% set year_counts = {} %}
{% for month, items in archives_data %}
    {% set y = month|date('Y') %}
    {% set year_counts = year_counts|merge({ (y): (year_counts[y] ?? 0) + items|length }) %}
{% endfor %}

<div class="archives-tree">
{% set active_year = null %}
{% set first_group = true %}
{% for month, items in archives_data %}
    {% set year = month|date('Y') %}

    {% if year != active_year %}
        {% if active_year is not null %}
                </ul>
            </details>
        {% endif %}
        {% set active_year = year %}

        <details class="archive-year"{% if first_group %} open{% endif %}>
            <summary class="archive-year-toggle">
                <a href="{{ archives_url ?? base_url }}/{{ config.plugins.archives.taxonomy_names.year }}{{ config.system.param_sep }}{{ month|date(config.plugins.archives.taxonomy_values.year)|e('url') }}">
                    {{ year }}
                </a>
                {% if archives_show_count %}
                <span class="label">{{ year_counts[year] }}</span>
                {% endif %}
            </summary>
            <ul class="archives archive-months">
        {% set first_group = false %}
    {% endif %}
            <li>
                <a href="{{ archives_url ?? base_url }}/{{ config.plugins.archives.taxonomy_names.month }}{{ config.system.param_sep }}{{ month|date(config.plugins.archives.taxonomy_values.month)|lower|e('url') }}">
                    {% if archives_show_count %}
                    <span class="label">{{ items|length }}</span>
                    {% endif %}
                    <span class="archive_date">{{ month|td(null, 'MMMM') }}</span>
                </a>
            </li>
{% endfor %}
{% if active_year is not null %}
        </ul>
    </details>
{% endif %}
</div>
And last but not least, add the required CSS to user/themes/jcs-quark2-child/css/custom.css. Here’s a tip that should save you from having to spend a lot of time troubleshooting: You should always add changes to this file at the very end. If you’ve edited the same classes before, this will reliably overwrite those earlier changes. However, it’s a good idea to check the file every now and then for duplicate classes and merge them.
/* The plugin's own “archives.css” file continues to handle the styling of .archive_date and .label;
   this file simply styles the new wrapper at the year level and reduces the line spacing. */

.archives-tree .archive-year {
    margin-bottom: 0.25rem;
}

.archives-tree .archive-year-toggle {
    display: flex;
    align-items: center;
    cursor: pointer;
    list-style: none;
    font-weight: 600;
}

/* The default drop-down arrow created by the operating system is
   hidden so that both browsers look consistent; instead,
   we draw our own using ::before. */
.archives-tree .archive-year-toggle::-webkit-details-marker {
    display: none;
}

/* Keep the default position “flex-start” for the parent element, and if you
   enable “archives_show_count,” simply move the badge to the right using “margin-left: auto”
   (see .archives-tree .archive-year-toggle .label below). */
.archives-tree .archive-year-toggle::before {
    content: "\25B8"; /* ▸ */
    display: inline-block;
    flex: 0 0 auto;
    margin-right: 0.5em;
    transition: transform 0.15s ease;
}

.archives-tree .archive-year[open] > .archive-year-toggle::before {
    transform: rotate(90deg);
}

.archives-tree .archive-year-toggle > a {
    flex: 0 1 auto;
}

.archives-tree .archive-year-toggle .label {
    margin-left: auto;
}

.archives-tree .archive-months {
    margin: 0 0 0.25rem 1.1rem;
    padding: 0;
    list-style: none;
}

/* The default styles of the theme or plugin seem to assign generous
   margins/spacing to each archive row (this is the same “wasted space” as in the original
   flat list, only now it’s more visible because the entries are grouped closer
   together at the top and bottom). Force a compact line height here; use !important, since we
   don’t know the exact competing selectors or their specificity in this session—
   remove it as soon as you’ve made sure it isn’t needed anywhere else. */
.archives-tree .archive-months li {
    margin: 0 !important;
    padding: 0 !important;
    line-height: 1.7 !important;
}

.archives-tree .archive-months li a {
    display: flex !important;
    align-items: center;
    gap: 0.4em;
    padding: 0.1rem 0 !important;
    margin: 0 !important;
}
I made a few assumptions in this customization, such as the sort order. As a website owner, you can do this (unlike a theme or plugin developer), but you should note it in the comments. I’ve spent many hours troubleshooting issues that I had set up myself months earlier but then forgotten about.
Conclusion
If you’ve followed the steps in this post—at least those in the “Creating a Child Theme” section—on your website, you now have everything you need to make any desired changes in a way that’s update-safe. If you’re hesitant to tackle functional changes—like in my Archives plugin example—just zip up your child theme and use an LLM. A well-crafted prompt with a link to your website and the attached zip file will enable ChatGPT, Claude, Mistral, and their counterparts to implement it for you. They can also be a real lifesaver when it comes to consolidating a custom.css file that’s gotten too bloated.
I’m happy to answer questions on this topic on the Fediverse.